Build a WordPress Theme from Scratch
Last modified: July 7, 2026

In the following tutorial I will guide you through the entire process of creating a WordPress starter theme from scratch, integrating SASS and Bootstrap.
It seems like most of the people that claim to be “Wordpress developers” are actually “Wordpress implementers”, meaning they take ready-made WordPress themes, add some style to it, add a logo, add a bunch of WordPress plugins and walla – they have a site. Just the thought of building a WordPress theme from scratch makes them very anxious.
Seeing how WordPress is becoming more and more popular by the minute, it should be important for anyone giving WordPress services to be at the top of their game. Meaning, you need to be able to build basically anything a client asks you to, and not be dependent on things that were already built by others. For that reason, basically any project I take, will be built with a starter theme. So basically I create a unique WordPress theme from scratch for any project.
When editing functions.php or any PHP file on your WordPress site, a small typo can cause a parse error that takes the site down. See how to fix the syntax error to recover using FTP or your hosting file manager.
| # | Name | Image | |
|---|---|---|---|
| 1 |
Learn Wordpress with Udemy
|

|
More Info
|
* This button will show the rest of the post and open up an offer from a vendor
Building a Wordpress Theme from Scratch - Easier said than done?
Perhaps. In order to be an actual “Wordpress developer” you will need to be fluent in:
HTMLCSSSASS(Will be discussed later on)
JavascriptjQueryPHPMYSQL(the amount ofMYSQLwritten in WordPress varies, depending what you are building)
So essentially, you need to be an actual developer, know programming languages and web technologies. Knowing how to install a WordPress theme & plugins on a server isn’t sufficient for becoming any type of developer.
Wordpress Theme File Structure
In order to start building a WordPress theme from scratch, we will need to understand the structure of a WordPress theme. So let’s start!
Download WordPress to your local machine from WordPress.org and unzip the files. What we are interested in, is located in: wp-content -> themes
Building the Wordpress Starter Theme from Scratch
You will see a few pre-installed themes. In our current location we will create a new folder with the name of the theme that I want to build. Since I’m planning on building a clean starter theme based on Bootstrap, I’m going to call it ScanWP_starter .
The first file a theme has to have is a style.css file. At the top of the file we must enter a few comments, letting WordPress know what our theme name is, there are many more optional comments, Here is an example of what I’m adding to my starter theme:
/*
Theme Name: ScanWP_starter
Theme URI: http://scanwp.net
Author: Avi Klein
Author URI: https://x2clickseo.com
Description: A clean starter theme based on Bootstrap
Version: 1
License: GNU General Public License v2 or later
License URI: http://www.gnu.org/licenses/gpl-2.0.html
Tags: SASS, clean, bootstrap
Text Domain: ScanWP_starter
*/
Here is an explanation of the comments:
- Theme name: pretty self-explanatory, this is the name of your theme that you will see in your admin
- Theme URI: the URI that the theme could be downloaded from
- Author: the name of the actual developer
- Description: write anything you want about the theme, who it’s meant for etc.
- Version: version number if you are planning to upload your theme to the WordPress Repository or any other WordPress Theme store like Themeforest and keep updating it.
- License: I leave the comment with the GNU license assuming it’s for free use.
- Same as license URI
- Tags: If you look through WordPress.org for themes you will see lots of tags such as these. This is where they come from.
- Text Domain: we won’t talk about this much but it’s the name used by translators of your theme.
Ok, so now that we’ve got that out of the way, we only have 2 more files to add before we can actually activate our new theme: functions.php and index.php .
You could actually add these 2 files without one letter of code in them. Now your theme can be activated.
However, in order to activate the theme, we need to have an active WordPress installation. If you have one, you can skip ahead, if not – here are your options.
Wordpress Local or Server Development
- Local development with XAMPP / WAMP / LAMP
- Local development with Desktop Server
- Development website on a live server
For learning purposes, I would choose a local development; there is no reason to learn on a live server. I’ve built many websites using XAMPP and WAMP but recently shifted to Desktop Server. It seems to make the process a bit more simple but the previous 2 are just fine.
Edit (2018): The best solution these days (personally) seems to be using Xampp and Gulp (will be discussed)
For more information regarding running XAMPP on your computer, read this: installing XAMPP and running WordPress on a local machine.
Activating the WP Theme
So, once you have a WordPress site up and running, we simply navigate from our root folder into the wp-content folder and in to the themes folder, which is where we were before, in that folder we should now have a folder with our theme name and 3 files in it:
Style.cssFunctions.phpIndex.php
Now we are ready to activate our new theme and start getting our hands dirty. Log in to your WordPress installation at: {{ yoursitename.com/wp-admin }} and you will be redirected to the login page. Add your username and password and log in. Now navigate to the Appearance tab which will bring you into the themes page.
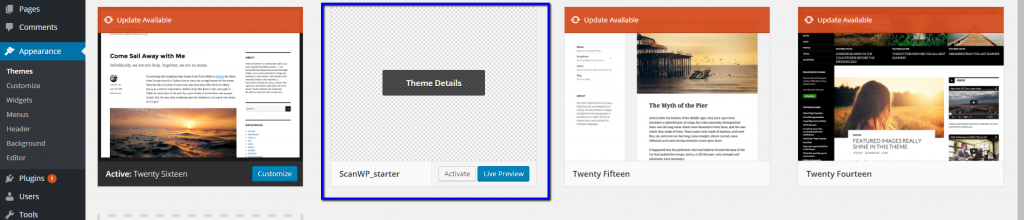
As you can see, my theme is present on the themes page. All I have to do is click the Activate button and our new theme will be in use.
Adding a Wordpress Theme Screenshot
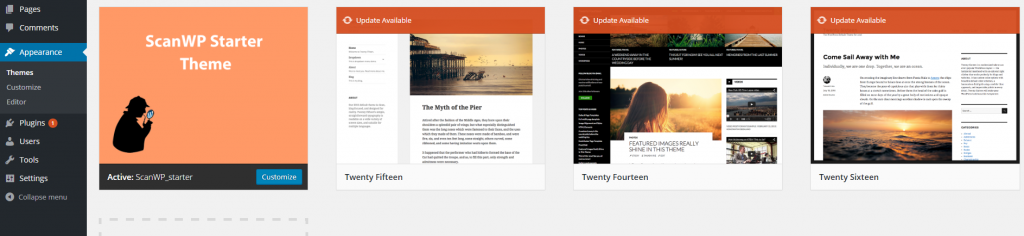
Though, if you realized, the pre-installed themes all have a nice screenshot, but our theme doesn’t have an image at all. This part is not mandatory, but if you plan on doing anything with this theme, it would be wise to add an image, and this is how it’s done.
Within our theme folder, we add a file called screenshot.png with the proportions of 880×660. Now once you refresh the themes page, you will see your theme’s screenshot image. This is what mine looks like:
Adding Twitter Bootstrap to our Wordpress Theme
First of all, just in case you have never heard of Bootstrap, here is a little preview. I’m not going to go in too deep into how to use it, you can read all about that in the documentation. Bootstrap just makes all the hard work of front-end development much easier. Bootstrap is made for people of basically any skill set. Even if you don’t know HTML & CSS that well, their documentation is perfect and you can just read along and get the hang of it.
Normally, when we develop for front end we have empty HTML tags such as
<div>,<a>,<p> and much more. However, they aren’t styled, meaning we have lots of work to style our entire application. Bootstrap went ahead and created lots of classes that can be used on your site within seconds, making the hard job much easier. There are lots of benefits while using Twitter Bootstrap and one of them being the grid system. Again, we won’t get into that here but you can read all about it.
Go to Bootstrap, there are 2 options of integration that are relevant to our project, downloading the actual files and integrating into our theme or using a CDN. For the purpose of this demonstration we will use the CDN option but feel free to choose the other option on your projects.
Basic Bootstrap Boilerplate
We want to take the starter template and integrate the code in our WordPress theme. The boilerplate code will be separated into 3 groups:
- Header
- Footer
- Content page
In WordPress sites, the entire top area of the site, referred to as a header, is located in a file called header.php , the lower area, referred to as a footer is… you guessed it – located in a file called footer.php and the rest will be located on the file we are using as our content page.
So, in your theme folder, add 2 new files named header.php and footer.php .
Code to add to the Theme Head
<!doctype html>
<html <?php language_attributes(); ?>>
<head>
  <meta charset="<?php bloginfo( 'charset' ); ?>">
  <meta name="viewport" content="width=device-width, initial-scale=1, shrink-to-fit=no">
  <link rel="profile" href="http://gmpg.org/xfn/11">

  <?php wp_head(); ?>
</head>

<body <?php body_class(); ?>>
As you can see, I added the entire code up until the opening body tag, added the WordPress language attributes function, the WordPress title function to the title, the wp_head which is a function that adds all the code needed before the head and the body_class function which gives unique classes to each page depending on a variety of variables.
Code to add to the Theme footer
<?php wp_footer(); ?>
<footer id="footer">

</footer>
</body>
</html>
The last piece we need in order to get things going is to include these 2 files in our content file. Currently we are going to use the index.php file. So, within index.php add the following:
<?php get_header(); ?>


 <h1><?php the_title(); ?></h1>


<?php get_footer(); ?>
Currently we have our footer set up, out header set up and our content file. If you refresh your site now, you should see the ever known “Hello World!”
<h1> tag on the page. Now that we’ve got that working, let’s add some functionality via the functions.php file.
Code to add to functions.php
You might have noticed we didn’t add any of the Bootstrap scripts or style. That’s because we’re going to do it the WordPress way – via functions.php.
function ScanWP_enqueue() {
    wp_enqueue_style('bootstrap', 'https://maxcdn.bootstrapcdn.com/bootstrap/4.0.0/css/bootstrap.min.css');
    if($_SERVER['SERVER_NAME'] != 'localhost'){
      wp_enqueue_style('style', get_template_directory_uri() . '/style.min.css');
    } else{
      wp_enqueue_style('style', get_template_directory_uri() . '/style.css');
    }
    wp_enqueue_script( 'customjs', get_template_directory_uri() . '/assets/js/custom.min.js', array('jquery'), '', true );
    wp_enqueue_style('Montserrat', "https://fonts.googleapis.com/css?family=Montserrat:700|Montserrat:normal|Montserrat:300");
    wp_enqueue_style('fontawesome', 'https://use.fontawesome.com/releases/v5.2.0/css/all.css');
    wp_enqueue_script( 'bootstrapcdn', 'https://maxcdn.bootstrapcdn.com/bootstrap/4.0.0/js/bootstrap.min.js', array('jquery'), '', true );
}
add_action('wp_enqueue_scripts', 'ScanWP_enqueue');
Within this one function we added the appropriate codes and styles to the header and footer. As an additional bonus, I added style functionality to decide which style sheet to show, added a Google font you can use for free & even Fontawesome.
Now lets add some more functionality:
add_theme_support( 'title-tag' );
add_theme_support( 'post-thumbnails' );
register_nav_menus( array(
    'header' => 'Custom Primary Menu',
  ) );

function ScanWP_widgets_init() {

  register_sidebar( array(
    'name'          => 'Footer 1',
    'id'            => 'footer_1',
    'before_widget' => '<div id="%1$s" class="widget %2$s">',
    'after_widget'  => '</div>',
    'before_title'  => '<h4 class="ttl">',
    'after_title'   => '</h4>',
  ) );

  register_sidebar( array(
    'name'          => 'Footer 2',
    'id'            => 'footer_2',
    'before_widget' => '<div id="%1$s" class="widget %2$s">',
    'after_widget'  => '</div>',
    'before_title'  => '<h4 class="ttl">',
    'after_title'   => '</h4>',
  ) );

  register_sidebar( array(
    'name'          => 'Footer 3',
    'id'            => 'footer_3',
    'before_widget' => '<div id="%1$s" class="widget %2$s">',
    'after_widget'  => '</div>',
    'before_title'  => '<h4 class="ttl">',
    'after_title'   => '</h4>',
  ) );
  register_sidebar( array(
    'name'          => 'sidebar',
    'id'            => 'sidebar',
    'before_widget' => '<div id="%1$s" class="widget %2$s">',
    'after_widget'  => '</div>',
    'before_title'  => '<h4 class="ttl">',
    'after_title'   => '</h4>',
  ) );

}
add_action( 'widgets_init', 'ScanWP_widgets_init' );
We’ve added a few basic functions just to make our WordPress theme work properly. Read more about functions.php tips.
- Adding the title tag option lets me remove it from the
header.phpand pull it from within WordPress. - Post thumbnails – just as it sounds. Enables the option to have thumbnails on every post on our site.
- We can build as many navigation menus as we want, though we need to register them first. Here I added one to begin with.
- The widgets is what wraps each widget you will add from within the admin.
wp_enqueue_style+wp_enqueue_scriptis a bit weird at first but it makes a lot of sense. Each script orcssfile you want to link to should be done from here. So I’ve added our BootstrapcssandJavascriptfiles here and removed them from theHTML. The last line has a few more parameters, here is the explanation: add the script with ajQuerydependency, do not add the WordPress version to the end of the link and the last true is to add the script in the footer instead of header. If you have any further questions aboutwp_enqueueyou can read up about it in the WordPress codex.
Adding a Navbar to the Wordpress Starter Theme
Now that we have a skeleton of our site, lets add a Bootstrap Navbar to our site header. There are many types of navbars that can be used and they are pretty flexible, I took the main navbar and removed most of its functionality and integrated the WordPress menu into it.
This is what my header.php looks like now:
<!DOCTYPE html>

<html xmlns="http://www.w3.org/1999/xhtml" <?php language_attributes(); ?>>

<head>

<link rel="profile" href="http://gmpg.org/xfn/11" />

<meta http-equiv="Content-Type" content="<?php bloginfo('html_type'); ?>; charset=<?php bloginfo('charset'); ?>" />

<meta name="viewport" content="width=device-width, initial-scale=1">


<?php wp_head(); ?>

</head>


<body <?php body_class(); ?>>

  <div class="container-fluid">


    <nav class="navbar navbar-default">

      <div class="container-fluid">

        <!-- Brand and toggle get grouped for better mobile display -->

        <div class="navbar-header">

          <button type="button" class="navbar-toggle collapsed" data-toggle="collapse" data-target="#bs-example-navbar-collapse-1" aria-expanded="false">

            <span class="sr-only">Toggle navigation</span>

            <span class="icon-bar"></span>

            <span class="icon-bar"></span>

            <span class="icon-bar"></span>

          </button>


        </div>


        <!-- Collect the nav links, forms, and other content for toggling -->

        <div class="collapse navbar-collapse" id="bs-example-navbar-collapse-1">

          <ul class="nav navbar-nav">

            <?php


              // Get the nav menu based on $menu_name (same as 'theme_location' or 'menu' arg to wp_nav_menu)

            // This code based on wp_nav_menu's code to get Menu ID from menu slug

            wp_nav_menu( array('menu' => 'primary', 'items_wrap' => '<ul><li id="item-id"></li>%3$s</ul>' ));


            ?>

          </ul>


        </div><!-- /.navbar-collapse -->

      </div><!-- /.container-fluid -->

    </nav>
The above code and explanation is the old one. This is the proper way to do things:
- Go to WP Bootstrap navwalker in Github and download the file called:
class-wp-bootstrap-navwalker.php - Save it in the root of your themes
- In your
functions.phpfile add the following line:require_once get_template_directory() . '/class-wp-bootstrap-navwalker.php';
- Add a file called nav.php to the theme folder and add the following:
<nav class="navbar navbar-expand-md" role="navigation"> <div class="container"> <a class="navbar-brand" href="<?php echo site_url(); ?>">Brand</a> <!-- Brand and toggle get grouped for better mobile display --> <button class="navbar-toggler" type="button" data-toggle="collapse" data-target="#bs-example-navbar-collapse-1" aria-controls="bs-example-navbar-collapse-1" aria-expanded="false" aria-label="Toggle navigation"> ☰ </button> <?php wp_nav_menu( array( 'theme_location' => 'header', 'depth' => 2, // 1 = no dropdowns, 2 = with dropdowns. 'container' => 'div', 'container_class' => 'collapse navbar-collapse', 'container_id' => 'bs-example-navbar-collapse-1', 'menu_class' => 'navbar-nav mr-auto', 'fallback_cb' => 'WP_Bootstrap_Navwalker::fallback', 'walker' => new WP_Bootstrap_Navwalker(), ) ); ?> </div> </nav> - Now just add the following in your
header.phpfile<?php require "nav.php"; ?>
So, we added the Bootstrap navbar using the walker and added the wp_nav_menu function in our functions file. You can read more about the navigation abilities here.
The Wordpress Loop
Lots of the dynamic content we print out on a page comes from a unique WordPress loop. Assuming you know PHP this will be easy for you to understand, if not – tough luck building WordPress sites entails programming.
The WordPress loop is very easy to implement. Go look at your index.php page, currently we are calling the header and footer and were able to call the page title. Now if we want to get any other content onto our page we need to add it using the loop (we will push the title into the loop as well.
Paste this code over our existing code on the index.php file:
<?php get_header(); ?>

<?php if ( have_posts() ) : while ( have_posts() ) : the_post(); ?>

  <h1><?php the_title(); ?></h1>
  <?php the_content(); ?>

<?php endwhile;  endif;?>

<?php get_footer(); ?>
Pretty simple, right? the_content(); function will print out all the content in the main meta box area within your admin.
The Wordpress Theme Homepage
WordPress lets us decide whether we want the homepage to show the last posts as a blog view or use an existing page as the homepage. However, there is a third option which is the only one I ever use. If you add a file called front-page.php , you can do anything you want. So, adding the exact code we just added to the index page to a new front-page.php file will give you just that. Just to make sure everything is working correctly, within the loop I’ll add a sentence “this is the homepage” and make sure I see it on the homepage.
Adding Page Type Templates (Not Page Templates) to the Theme
There are a bunch of types of pages and layouts on sites. Some of these are:
- 404 template
- An archive page
- A category page
- A post
- A page
WordPress has a well-built structure, without making any changes in the admin, we can control what file will be used as a template for the site content. To make things simple – index.php is the fallback file for everything basically. As we just saw, when I didn’t define a homepage, WordPress used the fallback file. If we wouldn’t define a template for the post or page, WordPress would do the same thing.
For this theme I will build a few basic templates that I usually use, feel free to add more if you need them.
Creating a Post and Page Template
The post template is called single.php and the page is simply page.php . Since I’m creating a clean starter theme, I’m going to keep it as simple as possible, just as I did for the homepage. So, I’ll copy my code from the homepage and paste it into my 2 new files.
At this point, just to make sure everything was done correctly, add a unique sentence on each of your new templates, navigate into the dashboard, view your sample page that WordPress pre populated and view it. Do the same for the post. If your pages appear with the sentence you added (a different one for the page and post), you are golden.
Creating a Category and Archive Template
Same exact process, just add 2 files:
archive.phpcategory.php
The code here is identical too. Since we are in a loop, you will see all the content, no matter if you have 1 or 5 entries.
Update: Here is the code to add to these files:
<?php get_header();  ?>


        <?php	the_archive_title( '<h1 class="archive-title">', '</h1>' ); ?>

    <?php if ( have_posts() ) : while ( have_posts() ) : the_post();?>

              <?php the_post_thumbnail(); ?>
              <?php the_title(); ?>
              <?php the_excerpt(); ?>
              <a href="<?php the_permalink(); ?>">Read More</a>

    <?php endwhile;  endif;?>

  <?php
  the_posts_pagination(
    array(
    'prev_text' => '<i class="fa fa-angle-left" aria-hidden="true"></i>',
    'next_text' => '<i class="fa fa-angle-right" aria-hidden="true"></i>',
    )
  ); ?>
<?php get_footer(); ?>
Creating a 404 Template
This process is a bit different, here we can just add a Nice message for the user. Add whatever you want in a file called 404.php .
Adding SASS into a Wordpress Theme
Update: Below this section we will discuss
Integrating SASS into your theme should be a default, if you haven’t started using SASS yet – here is a short recap.
SASS = Syntactically Awesome Stylesheets.
SASS files are compiled into CSS files, so basically the browser is still reading your regular css files, however these css files were compiled from multiple SASS files. SASS is normally split up into lots of subject related files. For instance you might have a settings.scss, menu.scss, admin.scss etc. and one CSS file that was created via a compiler.
So, how do we begin adding SASS to our WP Starter Theme?
First of all, in order to run a compiler, you would normally develop locally and then upload the compiled file to the live server when done. The compiler I use and highly recommend is – Prepros which has a trial option, so feel free to check it out before purchasing.
Once you have Prepros running on your local machine, press the “Add Project” button on the bottom left and choose the main folder you have WordPress set up on.
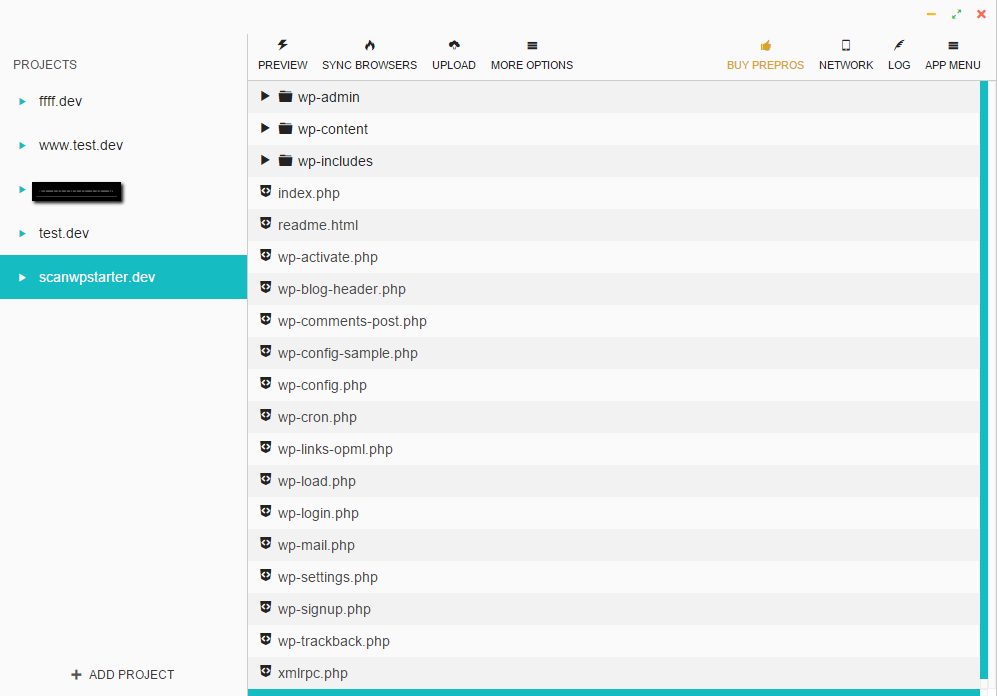
Once Prepros is set up, you will see all the WP files in the right area just like on the image above. Now click above on the “more options” button and click on “project options”. Navigate to the CSS tab and remove whatever is written in the second field, your project should now look like this:
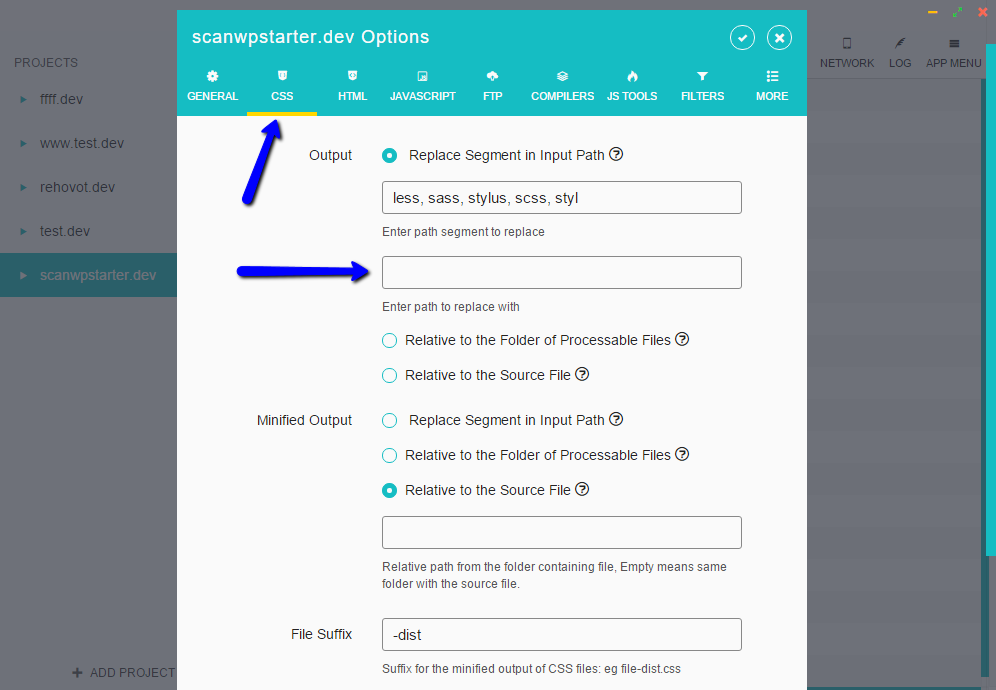
Now save options. What we did here is tell Prepros to compile the css file in our theme’s root folder. In our case in will compile the css file into our theme’s style.css file.
I highly recommend you read up on SASS tutorials if you haven’t used it before.
Now all I need to do is create a new folder which I will name sass in my theme root and inside it I will create 2 files. style.scss and scanwp.scss. The second name will be for some of my global settings and styles, you could name it as you like. The first is named style since this file will be importing all the SASS files and compiling a file names style.css which we need to have in WordPress any way. Remember the comment we added in our style file? Well, we need to add it to the SASS file now, so my style.scss file looks like this:
/*
Theme Name: ScanWP_starter
Theme URI: http://scanwp.net
Author: Avi Klein
Author URI: https://x2clickseo.com
Description: A clean starter theme based on Bootstrap
Version: 1
License: GNU General Public License v2 or later
License URI: http://www.gnu.org/licenses/gpl-2.0.html
Tags: SASS, clean, bootstrap
Text Domain: ScanWP_starter
*/

@import "scanwp";
This way, the first thing on the style file will be my comment and then everything else.
Just to make sure it works, add a regular css rule to both files and make sure they are compiled into your style.css file in the root.
Well… that’s it!
What do you think? Are you ready to take your developing skills to the next level?
Just in case you had a hard time keeping up, you can download the theme zip here:
Using Gulp With Wordpress
There is a great solution to this, go to the repository on Github, and download. All you really need here are these 2 files:
- gulpfile.js
- package.json
Now save these 2 files to your theme’s root.
Now open the terminal within your folder and run this command:
npm init – now hit a bunch of enters until it finishes. Next run the command npm install and see how all the dependencies start to be installed on your computer.
Note: if you don’t have NPM installed on your computer, you will need to follow the instructions here.
Note2: The code here is for Windows, you might need to make some adjustments.
Once you are finished, open your gulpfile.js file and add your project name but most importantly – your project URL. For example: http://localhost/blog/
Now in your terminal just type gulp
Wait a few seconds and it will run. Now all we need to do is build our file structure in order for gulp to know where our SCSS file and JS files are.
Before we finish: you must have noticed that we didn’t really add any HTML to our theme. This is for the simple reason that the theme that we are building here is just a “starter theme” with literally nothing in it except the PHP functionality to print everything out where it should be. DO NOT install this on your site expecting it to switch your current theme. You need to create the correct HTML, CSS etc. The point of this tutorial was to show you how to create the entire file and function layout but the rest of it is up to you.
And here is the whole thing put together:
Get Cheap Hosting for Your New Wordpress Theme
Now That you have a new Theme, you need web hosting.
Here is our recommendation with 50% off for our readers!
#1 recommended web hosting by WordPress themselves.
- Free Domain
- Free SSL
- 1 click WordPress install
Learn how to Build a Wordpress Theme From Scratch
This tutorial might be exactly what you need but it might be way over your head. In order to build a WordPress theme from scratch, as we stated above – you need to know various programming languages and technologies. Learning WordPress isn’t all about copy and pasting it’s about learning web basics first, before anything else.
Below is the best place to learn WordPress professionally in order to give you the ability to build themes from scratch without following tutorials every time.
Learn Wordpress with Udemy
Udemy is probably the top online learning resource around. Udemy offers not only web development courses, web design software, but a large array of subjects that don’t necessarily have any connection.
It’s pretty easy to find a really good course on Udemy.
First, choose your subject. You can choose “WordPress” but you could also decide to focus first on PHP, Javascript, HTML, CSS etc.
Just go to Udemy, search for your subject, go through the results, search for something that works for you, that the tutor seems like he knows his stuff, that has enough sales and ratings and just go for it.
Prices usually range between $10-$20 which is an incredible price.
- Building a Wordpress Theme from Scratch - Easier said than done?
- Wordpress Theme File Structure
- Building the Wordpress Starter Theme from Scratch
- Wordpress Local or Server Development
- Activating the WP Theme
- Adding a Wordpress Theme Screenshot
- Adding Twitter Bootstrap to our Wordpress Theme
- Basic Bootstrap Boilerplate
- Code to add to the Theme Head
- Code to add to the Theme footer
- Code to add to functions.php
- Adding a Navbar to the Wordpress Starter Theme
- The Wordpress Loop
- The Wordpress Theme Homepage
- Adding Page Type Templates (Not Page Templates) to the Theme
- Creating a Post and Page Template
- Creating a Category and Archive Template
- Creating a 404 Template
- Adding SASS into a Wordpress Theme
- Using Gulp With Wordpress
- Get Cheap Hosting for Your New Wordpress Theme
- Learn how to Build a Wordpress Theme From Scratch
- Learn Wordpress with Udemy
Related Posts


Offers & Promos
 Website Maintenance – Use Promocode: scanwp
  Advanced JetPlugins for Elementor
  Semrush 14 days trial
  Kinsta – Managed WordPress Hosting
  Bluehost Hosting
 5 thoughts on “Build a WordPress Theme from Scratch”
Comments are closed.
How to make the date post hidden from all search engine result?
The only way to hide the date the post was updated, is to remove it from the actual code of the post.
This is an absolutely amazing post. Thank you so much for sharing. I know that sounds super cheesy, but I’ve been looking for something that would connect the dots for me. I’m not a web designer – or claim to be a developer, but I’ve wanted to learn how to create my own theme forever – but all of the tutorials, or even online courses, that I’ve seen are way over my head. This was not!
I haven’t jumped into the SASS section yet, but I wanted to jump in and say thanks, first. I’m really looking forward to making this new theme uniquely mine.
Thanks,
Loralee @Her Portable Biz
Hello, can you help me to develope a dynamic blog template
Hi John,
We could definitely help you out with whatever you might need.
Send us a message through the contact page – https://scanwp.net/blog/contact/
Include exactly what you need built and we will get back to you.