
12 functions.php Useful Functions
Last modified: June 18, 2026

Those of you that have dug around the WordPress website structure a bit or if you are even very familiar with the WordPress file structure, you must know that one of the few mandatory files is the famous functions.php file. WordPress cannot run a site without a functions.php file.
The functions.php file is used for various tasks such as:
- Adding fonts
- Adding scripts
- Getting a parent theme’s style
- And much more…
The functions.php file can be looked at sort of like a plugin. You can add all your php functionalities in it, however, unlike a plugin, the functions used in it will be recognized in the current theme while a plugin is recognized on any theme you might add to your website.
So, seeing how there is literally no limit to tricks and functions you can add to the functions.php file, here are some favorites to get you started.
* This button will show the rest of the post and open up an offer from a vendor
1. Remove Wordpress Version from Links
Many spammers look for WordPress installations that print out the WordPress version they use. It is a good idea to stop using it. There are manual ways to do it, however you can just head over to your functions.php file and paste this function:
function scanwp_remove_wp_version() {
return '';
}
add_filter('the_generator', 'scanwp_remove_wp_version');
2. Change the Wordpress Admin Footer Text
Sometimes if you are building a website for a client, you want to go the extra mile and show that you are better than anyone he ever worked with before. One of the ways to do that is to notice the small details that others don’t. A great example of that is to add a custom footer in the WordPress admin. The default footer reads: “
function scanwp_change_admin_footer () {

echo 'Created by <a href="http://scanwp.net" target="_blank">Scan WP</a></p>';

}

add_filter('admin_footer_text', 'scanwp_change_admin_footer');
You can even add a parameter in the link in order to track clicks in your Google analytics to see if it helps you get some of your previous clients’ traffic.
3. Add a Custom Widget in the Wordpress Dashboard
You see these all the time. Lots of plugins add custom widget messages in your dashboard and lots of the themes do that too. Now, so can you. What I like to do is add a custom message meant for my client. This is how I do it:
add_action('wp_dashboard_setup', 'scanwp_dashboard_msg');

function scanwp_dashboard_msg() {
global $wp_meta_boxes;

wp_add_dashboard_widget('custom_help_widget', 'Scan WP - Message', 'scanwp_admin_msg_text');
}

function scanwp_admin_msg_text() {
echo '<p>This custom theme was created by <a href="http://scanwp.net">Scan WP</a>. For assistance contact us <a href="mailto:[email protected]" target="_blank">this email</a></p>';
}
Add the above 2 functions to your functions.php file, change the text to fit whatever you want your client to see and refresh your admin dashboard page. This is what it should look like:

4. Add a New Menu to Your Wordpress Theme
Some themes come with 1, 2 or 3 navigation menus, say header, footer and social icon menus. But what if you want to add a new custom menu to the sidebar? How can you do that? Luckily enough it’s pretty simple, lets add the following code into our functions.php file:
function Scanwp_sidebar_menu() {
  register_nav_menu('sidebar-menu',__( 'Sidebar Menu' ));
}
add_action( 'init', 'Scanwp_sidebar_menu' );
We just registered a menu “location” and you will be able to see it on your menu page in the admin. It will look something like this:
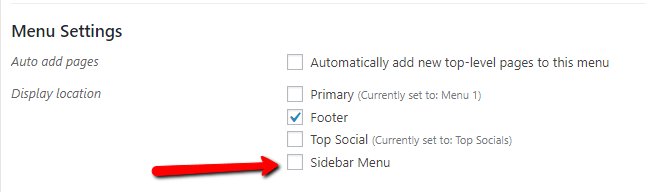
Now all you have to do is create a new menu on that page and set its location to “sidebar menu”.
The last thing you need to do is paste the following code where you want the navigation menu to appear (on your sidebar using my example):
<?php
//Prints out the sidebar navigation
wp_nav_menu( array(
    'theme_location' => 'sidebar-menu',
    'container_class' => 'sidebar-navigation' ) );
?>
5. Add New Widget Areas in Wordpress
You know how you have themes that have widget areas that you can control from the widget page? They usually look similar to this:

Well, now you are going to create one yourself. Head over to your functions.php file and paste the following:
function scanwp_widget_area() {

  $args = array(
    'id'            => 'scanwp_sidebar',
    'name'          => __( 'Special Footer Text', 'text_domain' ),
    'description'   => __( 'Prints out special text added from the widget page', 'text_domain' ),
    'before_title'  => '<div class="scanwp_sidebar">',
    'after_title'   => '</div>',
    'before_widget' => '<aside id="%1$s" class="widget %2$s">',
    'after_widget'  => '</aside>',
  );
  register_sidebar( $args );

}
add_action( 'widgets_init', 'scanwp_widget_area' );
If you refresh your widgets page you will now see a new widget area where you can drag any of the available widgets to. In order to actually use whatever you plan on adding to that widget, go to your footer.php file (just an example because we called the widget special footer text) and print the following where you want to see the widget:
<?php if ( is_active_sidebar( 'scanwp_sidebar' ) ) : ?>
  <div id="special-footer-text" class="special-footer-text">
  <?php dynamic_sidebar( 'scanwp_sidebar' ); ?>
  </div>
<?php endif; ?>
6. Disable Wordpress' Built-in Search
There are lots of websites that do not need WordPress’ built-in search form, this is how you can remove the actual feature. Note: you will still need to remove the actual form if it’s built in to your theme:
function scanwp_remove_search( $query, $error = true ) {

if ( is_search() ) {
$query->is_search = false;
$query->query_vars[s] = false;
$query->query[s] = false;

// to error
if ( $error == true )
$query->is_404 = true;
}
}

add_action( 'parse_query', 'scanwp_remove_search' );
add_filter( 'get_search_form', create_function( '$a', "return null;" ) );
7. Change the Read More Text in Wordpress Excerpt
I’ve probably had to do this change on over 50% of the websites I’ve built. WordPress excerpt has a default “read more” text which doen’t always fit what you want to use. In this example I changed it to “…”(three dots), feel free to change it to whatever you want. Just add the following to your functions.php file:
function change_read_more() {
    return '<a class="readmore" href="' . get_permalink() . '">...</a>';
}
add_filter( 'the_content_more_link', 'change_read_more' );
8. Change Wordpress' Excerpt Length
Continuing with WordPress’ built-in excerpt – how about changing its length? WordPress excerpt is usually used for the short version of blog posts on blog index pages / category pages / tag pages etc. You usually see the featured image, title, link and excerpt with 55 words. What if I want to show 70 words? Let’s do just that. Paste the following into functions.php:
function scanwp_change_excerpt_length($length) {
return 70;
}
add_filter('excerpt_length', 'scanwp_change_excerpt_length');
9. Remove Wordpress Admin Bar
Sometimes when editing a site and being logged in, I don’t want to see the black admin bar at the top of the page. There is a very simple solution for that. Paste this in functions.php:
show_admin_bar(false);
Done 🙂
10. Remove the Default "Welcome to Wordpress" Widget
If that annoys you like me, just paste this in functions.php:
remove_action('welcome_panel', 'wp_welcome_panel');
11. Upload More Types of File Types in Wordpress
If you ever tried to upload an SVG file as a logo, you know what this is all about. By default WordPress only allows a few types of files to be uploaded to the media folder. Though, you can easily change that if you need to by pasting this into functions.php:
function additional_myme_types($mime_types){
    $mime_types['svg'] = 'image/svg+xml';
    //Add additional mime types here
    return $mime_types;
}
add_filter('upload_mimes', 'additional_myme_types', 1, 1);
If there is a certain mime type that you want to add that isn’t SVG then just google the mime type and add another row with the correct name right above the return row.
12. Add a Custom Login Logo
This is another one that shows your client that you went the extra mile. Instead of showing the default WordPress logo when your client logs in to hos website, lets show him his logo instead. Add the following to the functions.php file:
function scanwp_custom_login_logo() {
     echo '<style type="text/css">
         h1 a { background-image:url('.get_stylesheet_directory_uri().'/img/logo.jpg) !important;
         height: 120px !important; width: 410px !important; margin-left: -40px;}
     </style>';
}
add_action('login_head', 'scanwp_custom_login_logo');
Now all you need to do is create a folder called “img” and add a “logo.jpg” file, then go to your login page and see what it looks like.
Conclusion
These functions are incredibly useful, lots of websites can use most of the functions we used here. If you want to take your WordPress website building to the next level, these functions are definitely the way to start.
Good luck! One practical use case: you can use a simple filter to remove the URL field from WordPress comments — a common spam vector that the default form includes. You can also use functions.php to customize WordPress excerpt length and read more text — useful for blog archive pages.
- 1. Remove Wordpress Version from Links
- 2. Change the Wordpress Admin Footer Text
- 3. Add a Custom Widget in the Wordpress Dashboard
- 4. Add a New Menu to Your Wordpress Theme
- 5. Add New Widget Areas in Wordpress
- 6. Disable Wordpress' Built-in Search
- 7. Change the Read More Text in Wordpress Excerpt
- 8. Change Wordpress' Excerpt Length
- 9. Remove Wordpress Admin Bar
- 10. Remove the Default "Welcome to Wordpress" Widget
- 11. Upload More Types of File Types in Wordpress
- 12. Add a Custom Login Logo
- Conclusion
Related Posts


 Website Maintenance – Use Promocode: scanwp
  Advanced JetPlugins for Elementor
  Semrush 14 days trial
  Kinsta – Managed WordPress Hosting
  Bluehost Hosting