Contact Form 7 Thank You Page Redirects
Last modified: January 13, 2020
If you are a regular WordPress user / developer you must be (very) familiar with the Contact Form 7 plugin. One of the most known attributes of contact forms in general is redirecting to a thank you page one the submission is successful. Contact form 7 has changed their redirect code as of the end of 2017. Therefor, updated CF7 plugins will not work with the previous code any longer. Below is a short recap of what has changed and how to currently do a Contact Form 7 Thank You Page Redirect properly.
| # | Name | Image | |
|---|---|---|---|
| 1 |
Contact Form 7 Redirection
|

|
More Info
|
* This button will show the rest of the post and open up an offer from a vendor
Old Code - on_sent_ok
You may have seen this before: on_sent_ok:
Up till the end of 2017 the code to redirect a successful form to a thank you page used to look something like this:
on_sent_ok: "location = 'http://www.domain.com/thank-you'";
However, this code is deprecated and should no longer work.
New Code - wpcf7mailsent
Here is the new code and a few ways to use it.
FYI – you can read more about this on the contact form 7 documentation page.
In File - One Page
Add the following to your footer.php file above the closing </body> tag (switch to your actual domain and thank you page URL)
<script>
document.addEventListener( 'wpcf7mailsent', function( event ) {
    location = 'http://example.com/thanks/';
}, false );
</script>
Inject Into Footer from Functions.php
Instead of pasting the code in the footer.php file, you could do it a bit more professionally and inject it via a function.
Just paste the following at the bottom of the functions.php file and change the URL to your own.
add_action( 'wp_footer', 'redirect_cf7' );

function redirect_cf7() {
?>
<script>
document.addEventListener( 'wpcf7mailsent', function( event ) {
       location = 'https://www.example.com/thanks/';
}, false );
</script>
<?php
}
Add to a Javascript File
Locate your Javascript file that you could add scripts to (usually named functions.js but not necessarily) and paste in the following:
document.addEventListener( 'wpcf7mailsent', function( event ) {
       location = 'https://www.example.com/thanks/';
}, false );
Don’t forget to add your own thank you page URL instead of the demo one.
Multiple Thank You Pages
The old way would enable us to have a unique thank you page for each form, we would just add the on_sent_ok function and redirect the form to a specific thank you page that we needed.
Nowadays it doesn’t work that way, but luckily the code to create such functionality isn’t that difficult.
All we need to do is to add a function that will store the different thank you pages and connect them to the correct forms.
Add the following to the bottom of your functions.php file (instead of the option above).
add_action( 'wp_footer', 'redirect_cf7' );

function redirect_cf7() {
?>
<script type="text/javascript">
document.addEventListener( 'wpcf7mailsent', function( event ) {
   if ( '101' == event.detail.contactFormId ) { //if the form if equals #101
      location = 'https://www.example.com/thanks1/';
    } else if ( '365' == event.detail.contactFormId ) { //if the form if equals #365
      location = 'https://www.example.com/thanks2/';
    } else if ( '987' == event.detail.contactFormId ) { //if the form if equals #987
      location = 'https://www.example.com/thanks3/';
    } else { // Default thank you page for all forms which are not 101, 365 or 987
      location = 'https://www.example.com/thanks-main/';
    }
}, false );
</script>
<?php
}
Code Explanation:
First of all you need to know what your form’s page id is. To get your page id, just look at the shortcode. Here’s an example: ![]()
– as you can see, this contact form id number is 48.
Now, all you need to do is:
- Switch the id number in the function to your own
- Switch the thank you page URL to your relevant one
If you want to add more options, just copy and paste everything between else if and }adding more of those will give you more thank you page options.
If you don’t have a default thank you page, just remove this entire area:
else { // Default thank you page for all forms which are not 101, 365 or 987 location = 'https://www.example.com/thank-you-3/'; }
Contact Form 7 Redirection

Contact Form 7 Redirection is a Free plugin that takes away the hassle from doing all the above in code.
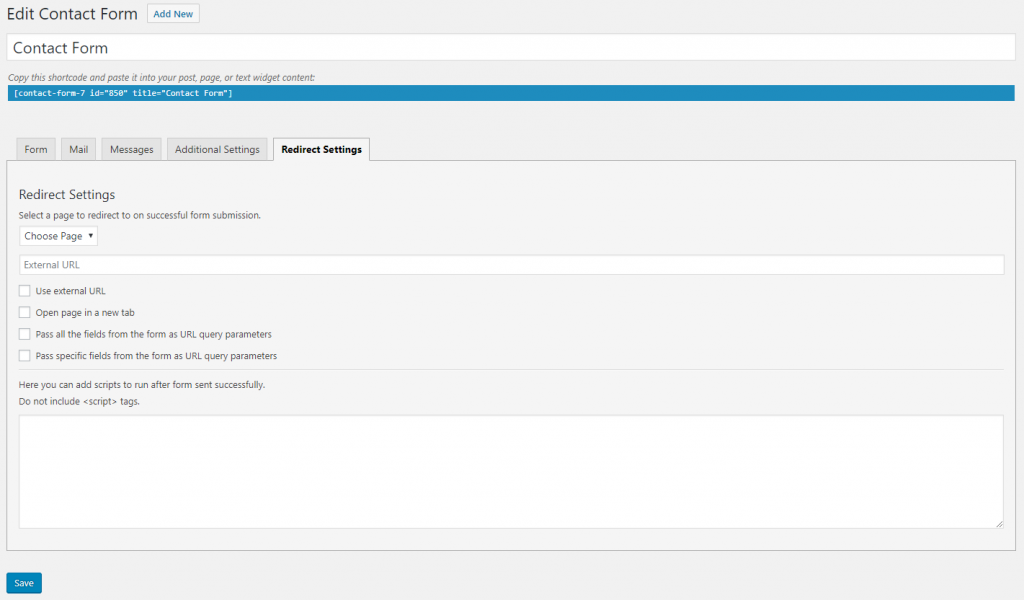
After installing the plugin you will have an additional settings area in your contact form page:

In the additional area you will have several options where you will be able to choose where to redirect the contact form, and a few more additional options.
If you are not a coder and have no idea how to implement everything written above, this is the perfect solution for you.
Final Thoughts
There are various options to redirecting forms to thank you pages. You might want to redirect to a specific page depending on choosing an option from a drop down menu in the form. This is possible too, however the code really depends of the specific form which is why we didn’t add this option here.


 Website Maintenance – Use Promocode: scanwp
  Advanced JetPlugins for Elementor
  Semrush 14 days trial
  Kinsta – Managed WordPress Hosting
  Bluehost Hosting