
13 Tips to Speed Up WordPress Sites
Last modified: June 18, 2026

WordPress site speed matters for two reasons most people already know: Google factors it into rankings, and slow pages lose visitors before they even see your content. What is less obvious is how many separate things contribute to a slow load time, and that fixing the right one can make a bigger difference than fixing all the wrong ones.
At Scan WP, we have worked on WordPress sites across every speed profile. Some needed a single change. Others needed a full pass through every layer: hosting, caching, images, scripts, and database. Speed testing tools have also changed significantly. Google now measures Core Web Vitals (LCP, CLS, and INP) as part of its page experience ranking signals, which means raw load time is not the only number to watch.
This guide covers 13 concrete things you can do to speed up a WordPress site, from the easiest plugin installs to the more technical fixes. Work through them in order, check your speed score between steps, and stop when you are satisfied with the result.
Here is Our Extensive List of Tips to Speed Up Your WordPress Site
First, check where you are starting from.
| # | Name | Image | |
|---|---|---|---|
| 1 |
13. Check Your Core Web Vitals
|
|
More Info
|
* This button will show the rest of the post and open up an offer from a vendor
How to Check your Wordpress Site's Speed?
In order to know if you have a problem that needs to be dealt with, you need to know how to check your actual site’s speed. Here are three tools worth using:
- Pingdom checks your site’s load time, shows you all HTTP requests broken down by file type, and tells you which assets are taking the longest. It also compares your site to others it has tested, which gives you a realistic benchmark.

As you can see, even a site with a reasonable performance grade can still have room for improvement. - GTmetrix is one of the most widely used speed testing tools for WordPress. It combines Google Lighthouse and its own analysis to show you your Core Web Vitals scores (LCP, CLS, TBT), a waterfall chart of how each resource loads, and a prioritized list of recommendations. Run your test from a location close to where your audience is based for the most accurate results.
- Google PageSpeed Insights runs both a lab test and (for sites with enough traffic) a field data test using real user measurements from the Chrome User Experience Report. Its scores align directly with how Google evaluates your page experience signals. It does not tell you how long your page took to load in absolute terms, but it is the most relevant tool for understanding what Google sees.
Test your site in all three before and after making changes. The numbers will not always agree, but trends across tools are reliable signals.
What slows your Site down and how Can you Speed up your Wordpress Site?
AS mentioned earlier, there are several different things that can slow down your WordPress site, the trick is to know why your specific site is slow (assuming it is) and learn how to speed it up.
- WordPress Hosting – this subject can be an article on its own. You need a good and well known web host in order to have a fast loading WordPress site. There is a lot of controversy about WordPress web hosting so I won’t “go there” but in general here are a few recommendations:
- Bluehost
- WP Engine – Highly recommended for WordPress users – (3 free months)
- Siteground
- Cache – or the lack of it. It’s pretty standard these days to serve chached pages instead of loading the same information over and over via the server.
- Images – One of the most common reasons for a slow web page is adding extremely heavy and large images to WordPress.
- Scripts – whether if you added external scrips to your WordPress site or they came with your theme, slow WordPress sites are a lot of the time caused by scripts.
- Plugins – depending on what they do exactly, can cause you site to load slowly.
- Redirects – sometimes your site might have unnecessary redirects which will make the site load slower than it needs to.
- Outdated – Running an outdated WordPress site, an outdated plugin or even theme can be the cause of a slow loading WordPress site.
- Ads – if you have lots of banners and ads on your web page, that can definitely slow down the page load time. I will not go into this within the article, just something to take into consideration.
1. Install a Caching Plugin on your Wordpress Site

As mentioned above, there is a pretty good reason that most WordPress sites use a caching plugin these days. Unlike 10-20 years ago where all sites were standard HTML pages, WordPress sites are built dynamically. Dynamically built sites run lots of tasks in split seconds in order to deliver the content to the page. For example: even the most simple page on WordPress upon uploading the page, the server points to the database, searches for the correct post, pulls the title, the content, the meta tags (assuming you have an SEO plugin installed), the category, tags, featured image and more…
Instead of having our server work hard every time anyone comes to our page, we can install a caching plugin and serv the same exact content to every user without pointing to the database each time. The plugin created a “cached version” of each page the first time it loads, and from then on it serves the cached version instead of actually going to the database and searching for the entire information. I know what you’re thinking: “what if I change the content?” good question. Any caching plugin has the ability to “purge” the cache which in human means to clear the cache memory and start the process all over again.
Here are the Top 5 Wordpress Cache Plugins we Recommend
- WP Rocket – is considered to be the industry leader in terms of caching WordPress sites. WP Rocket is a premium plugin and has a few pricing options as you can see in the image below:
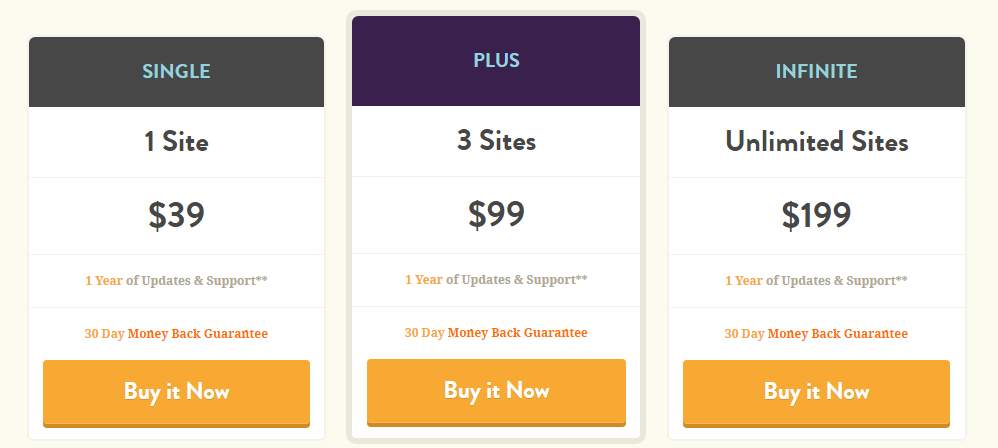
WP Rocket has many features such as GZIP, serving minified CSS, JS and HTML files (instead of calling 20 Javascript and CSS files from all your plugins etc. it turns them all into 1 minified file, removes spaces, tabs etc. saving uploading time) and most of all it’s user friendly for non technical users and has great technical support if you need it. - W3 Total Cache – is a free plugin that works incredibly and is the top 7th scanned plugin on our top 50 WordPress plugin list. This plugin is highly recommended and we’ve personally used it many times. It might be overwhelming since there are a lot of options and you might not know what everything means but once you get the hang of it, you will have page cache, concatenated and minified files, GZIP (and even CDN if you need it) ready to go.
- WP Super Cache – is pretty similar to the previous plugin. It’s built a bit differently, designed differently but overall it works pretty similar. I’ve used this plugin a few times as well and it worked just fine.
- WP Fastest Cache – again, this plugin is pretty similar to the 2 above. It might not be known as much as them but seems to work just fine. WP Fastest Cache has fewer settings and is not as overwhelming as W3 Total Cache but gets the job done. If you are not tech savvy you might want to give this one a try.
2. Optimize your Images Before Uploading Them
Images are consistently the largest contributor to page weight on WordPress sites. An unoptimized image from a camera or design file can be 5 to 15 MB; the same image properly prepared for the web should be 50 to 200 KB. That is a 50x difference in file size for visually identical output.
Before you upload:
- Resize to the actual display size. If your post content area is 800px wide, upload an image that is 800px wide (or 1600px for retina screens). Do not upload a 4000px image and let the browser scale it down.
- Use the right format. JPEG for photographs, PNG for images with transparency or sharp edges, WebP for everything else. WebP files are 25 to 35% smaller than JPEG at equivalent quality and are supported by all modern browsers. WordPress has natively supported WebP uploads since version 5.8.
- Compress before uploading. Tools like Squoosh (free, browser-based) let you compare compressed versions side by side before committing. Aim for under 100 KB for standard blog images and under 200 KB for full-width hero images.
If images are already uploaded: Use an image optimization plugin to compress your existing library in bulk. Options include WP Smush, EWWW Image Optimizer, and ShortPixel. These run in the background and can also enable WebP conversion for new uploads going forward.
Enable lazy loading. WordPress has native lazy loading built in since version 5.5. Images below the fold only load when the user scrolls toward them. This reduces the initial page load time without any plugin required. Check that your theme is not disabling the loading="lazy" attribute on image tags.
Ways to Optimize Images to Speed Up Wordpress Sites
- Size – The first thing you need to make sure is that the actual pixel size is not larger than the largest size you need it to be. I can’t tell you how many times I got an Image from a designer or a client “ready to add to the site” and when I checked, it was larger that 5000px (!!!), the reason it was that size is because it was ready for print and not web. So they sent me an image that was at least 3 times bigger (and heavier) than it needed to be.
- Weight – there are plenty ways to reduce the weight of your images:
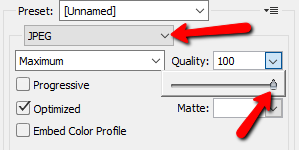
- Photoshop – first thing you need to do after adjusting the pixel size is reduce the weight with these 3 options:
- Export the image in Photoshop as “save for web”
- If possible and you don’t have any transparent areas on the image, make sure it’s a JPEG and not png, it will reduce the weight a lot
- Play around with the quality of the image to a point where you are happy with both the weight and the quality
- Export the image in Photoshop as “save for web”
- Photoshop – first thing you need to do after adjusting the pixel size is reduce the weight with these 3 options:
Top 3 Image Optimization Plugins for Wordpress
- WP Smush – top WordPress image optimizing plugin, downloaded over 700,000 times. The plugin allows you to compress JPEG, GIF and PNG images up to 32MB each. You can compress them when you upload them to a post or even compress in bulk after they were uploaded.
-
EWWW Image Optimizer – also highly recommended, downloaded over 500,000 times. This plugin just like the previous, allows you to compress images when they are being uploaded, it enables you to go through previously uploaded images and even gives you the option to change the image format. So if you didn’t change your png into jpg in Photoshop, you can do it here.
- TinyPng – pretty similar options as the previous 2. This plugin actually doesn’t have a file size limit which is pretty nice.
3. Keep your Wordpress Site Updated
If you have been following along and implemented the tips so far, you should start to see a big difference in you page loading speed.
The next tip is to stop running outdated sites. There are 3 places you need to keep your site updated on:
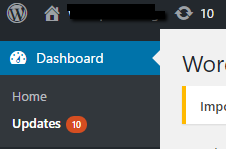
- WordPress core – It’s important to keep your WordPress up to date, if you have an update available, you will see this:

- Plugins – updating plugins are important because they are updated among other reasons, in order to be compatible with the newest WordPress version.
- Theme – this one is not as important than the others and has proven to screw up a lot of sites in the past 🙂 however, not a bad idea to be up to date.
*Before updating anything on your WordPress site, it’s crucial to backup your entire site. If you know how to create a local version of your site and update there first, that would be the best option.
4. Stop Using Sliders!
Sliders are a hazard for WordPress speed, SEO and even conversions. Humanity has developed banner and slider blindness and we barley even notice that we see a slider. When we do see it and are interested on what is on it, it transitions and annoys the heck out of us. Yoast has written an article about this subject called sliders suck. Sliders come with a huge amount of Javascript in them, CSS, heavy images and what not. There is literally no reason to use them. If you do have a slider on your site that you are trying to slow down, remove it and check out the difference. Thank me later…
5. Choose a Fast Wordpress Theme
This one is a great tip for starting out, however it might be a bit hard for an existing site to just pick up and change a theme. With that said, if you are just starting out, choosing a fast WordPress theme is one of the best things you can do. If you install a WP theme that was originally optimized for speed while being built, chances are you have a great head start.
6. Hardcode Known Information Instead of Calling the Database
There are some small bits of information that templates call the DB for, however they can just be hardcoded instead.
<html xmlns="http://www.w3;.org/1;9;9;9;/xhtml" <?php language_attributes(); ?>>
and
<meta http-equiv="Content-Type" content="<?php bloginfo('html_type'); ?>; charset=<?php bloginfo('charset'); ?>" />
can turn into:
<html xmlns="http://www.w3;.org/1;9;9;9;/xhtml" dir="ltr" >
and
<meta http-equiv="Content-Type" content="text/html; charset=UTF-8;" />
We just reduced 3 database calls. BTW – the charset is a common way for hackers to screw up your website. We just eliminated that.
7. Clean up Your Database
WordPress accumulates database clutter over time. Post revisions pile up every time you save a draft. Plugin installs and uninstalls leave orphaned option rows in wp_options. Spam comments, expired transients, and old log entries from deactivated plugins all take up space and slow down database queries.
What to clean:
- Post revisions: WordPress saves a copy of every draft save by default. A post edited 40 times has 40 revisions in the database. Most sites do not need more than 3 to 5 revisions per post.
- Auto-draft and trashed posts: These sit in the database indefinitely after you empty the trash.
- Spam and unapproved comments: Especially on older sites, these can number in the thousands.
- Expired transients: Plugin-generated temporary data that was never properly cleaned up. A cluttered
wp_optionstable with thousands of expired transients noticeably slows admin page loads. - Orphaned plugin data: Tables and option rows left behind by plugins you deleted. Some plugins are good about cleaning up on uninstall; many are not.
How to clean: Install WP-Optimize (free), which handles all of the above from a single admin screen. Run it on a schedule (weekly for busy sites, monthly for smaller ones). Always run a database backup before a bulk cleanup, especially the first time.
Limit post revisions going forward by adding this to wp-config.php:
define('WP_POST_REVISIONS', 5);
8. Remove Query Strings from Static Files
If you take a look at some of the links to JS and CSS files in your site header you might see something like this:
<script src="https://domain.com/wp-content/plugins/pluginname/js/script.js?ver=3;.5;.4;"></script>
Removing these parameters will speed the page speed so what you want to do is add the following PHP code into your theme’s functions.php file:
function _remove_script_version( $src ){
$parts = explode( '?ver', $src );
return $parts[0];
}

add_filter( 'script_loader_src', '_remove_script_version', 15, 1 );
add_filter( 'style_loader_src', '_remove_script_version', 15, 1 );
and save. If you look at your source code now, you will see the same link without the query string.
9.Defer loading of Javascript
This one is really important. When a page is loaded, the browser reads everything according to its order. Once it gets to a Javascript file for instance, it goes through the entire file before moving on. Deferring the loading of Javascript files tells the browser to wait until the HTML loads before going through the Javascript files. Since deferring jQuery can be problematic, we will defer all the JS files besides jQuery.
So, paste the following into your functions.php file again:
/* defer all js files except for jquery.min.js */
    function defer_parsing_of_js ( $url ) {
        if ( FALSE === strpos( $url, '.js' ) ) return $url;
        if ( strpos( $url, 'jquery.min.js' ) ) return $url;

        return "$url' defer onload='";
    }
if ( !is_admin() ) {
    add_filter( 'clean_url', 'defer_parsing_of_js', 11, 1 );
}
Now make sure that everything loads properly. If for some reason you need to exclude another file from deferring, just add another line such as the jQuery one, only with your file’s name.
10. Remove Unused Plugins
Every active WordPress plugin adds PHP code that runs on page requests, even if the plugin is not doing anything visible on the current page. Inactive plugins that are still installed do not load on the frontend, but they still exist as files WordPress has to scan during the update check process and that can occasionally cause conflicts.
Two separate cleanup tasks:
- Delete inactive plugins. If a plugin is deactivated, ask whether you will ever reactivate it. If the answer is no, delete it entirely. An inactive plugin that is never used is just clutter and a potential security risk if it has unpatched vulnerabilities.
- Audit active plugins for overlap. Many sites accumulate plugins that duplicate functionality: two social sharing tools, two SEO plugins, two form builders. Identify overlap and consolidate. Fewer active plugins means fewer database queries and less PHP execution per page load.
How to identify slow plugins: Use the Query Monitor plugin (free) to see which plugins are generating the most database queries per page load. It is the fastest way to identify a plugin that is causing a disproportionate performance impact. Deactivate it, test your load time, and reactivate to confirm.
A well-maintained WordPress site typically runs 10 to 20 active plugins. If you are running 40+, there is almost certainly overlap that can be eliminated without losing any functionality.
11. Keep It Simple
Every element you add to a WordPress page has a cost. A widget, a plugin, a social media feed, an animation, a related posts block: each one adds HTTP requests, database queries, or JavaScript execution. The cumulative effect of a dozen “small” additions is often a page that loads 2 to 3 seconds slower than it needs to.
Common areas where sites overcomplicate things:
- Homepage: Showing 20 recent posts instead of 6 to 8. Running a live social media feed that makes an API call on every page load. Adding a full-width hero video that blocks the first visible render. Each of these alone can cost 1 to 2 seconds on the initial load.
- Sidebars: Tag clouds (especially large ones), calendar widgets, and “popular posts” widgets that run their own database queries on every page load.
- Global scripts: Plugins that load their CSS and JavaScript on every page, even pages where they are not needed. A contact form plugin loading its scripts on every blog post is wasted overhead.
- Comments on old posts: Disabling comments on posts older than 6 months reduces the comment form load, the avatar requests, and related JavaScript on pages where engagement is unlikely anyway.
Before adding any new feature to a site, test your load time before and after. If the new feature costs 500ms and the benefit is marginal, reconsider whether it is worth it.
12. Set Browser Caching for Static Files
Browser caching tells a visitor’s browser to store static files (CSS, JavaScript, fonts, images) locally after the first visit. On subsequent visits, the browser loads those files from its local cache instead of downloading them again. For a returning visitor, this can cut page load time by 50 to 80% for the cached assets.
How to enable browser caching:
The modern approach depends on your caching plugin. WP Rocket, W3 Total Cache, and most other caching plugins include browser caching controls in their settings. Enable it there rather than editing .htaccess directly, since the plugin will generate the correct syntax for your server type.
If you prefer to set it manually in .htaccess on an Apache server:
<IfModule mod_expires.c>
ExpiresActive On
ExpiresByType image/webp "access plus 1 year"
ExpiresByType image/jpeg "access plus 1 year"
ExpiresByType image/png "access plus 1 year"
ExpiresByType image/gif "access plus 1 year"
ExpiresByType text/css "access plus 1 month"
ExpiresByType application/javascript "access plus 1 month"
ExpiresByType text/html "access plus 1 day"
</IfModule>
What to check: In Google PageSpeed Insights, the “Serve static assets with an efficient cache policy” audit shows which files have no cache expiry set or have expiry times under 1 week. Prioritize images and scripts that appear across multiple pages.
13. Check Your Core Web Vitals
Since 2021, Google has used Core Web Vitals as a ranking signal. These are three specific measurements of how a page performs for real users, not just total load time. Understanding what each one measures and how to fix it is now a core part of WordPress speed optimization.
The three Core Web Vitals:
- LCP (Largest Contentful Paint): How long until the largest visible element on the page is fully rendered. For most WordPress sites, the LCP element is either the hero image, the featured image, or a large heading. Target: under 2.5 seconds. The biggest LCP killer on WordPress is an unoptimized hero image combined with a slow hosting server.
- CLS (Cumulative Layout Shift): How much the page layout shifts while loading. Ads loading in, images without defined dimensions, web fonts loading late: all of these cause CLS. Target: under 0.1. Fix it by setting explicit width and height on all images, and using
font-display: swapon your web fonts. - INP (Interaction to Next Paint): How quickly the page responds after a user taps or clicks something. Replaced FID in 2024. Target: under 200ms. High INP is usually caused by heavy JavaScript running on the main thread.
How to check your Core Web Vitals:
- Run your URL through Google PageSpeed Insights. The “Field Data” section shows real-user Core Web Vitals if your site has enough traffic. The “Lab Data” section shows Lighthouse measurements from a simulated load.
- Check Google Search Console > Experience > Core Web Vitals for a report of which URLs on your site are failing.
WordPress-specific CWV fixes:
- LCP: Add
fetchpriority="high"and removeloading="lazy"from your above-the-fold hero image. WP Rocket and LiteSpeed Cache can do this automatically. - CLS: Ensure all images in your theme have explicit width and height attributes. WordPress auto-inserts these for media library uploads but check your theme’s logo and custom image blocks.
- INP: Defer or remove JavaScript that is not needed for the initial render. The Query Monitor plugin shows JavaScript execution time per plugin.
Final Word: Speed Up Your WordPress Site
Getting through all 13 of these tips is not a small task, but most sites will see their biggest gains from just a few: caching, image optimization, and hosting quality account for the majority of slow load times. Start there, measure your speed before and after each change, and stop when your scores are where you need them.
Core Web Vitals (tip 13) deserve special attention if your site ranks for competitive terms. Google measures LCP, CLS, and INP separately from raw load time, and the scores are based on real user data, not just Lighthouse simulations. A site that loads in 2 seconds but has a late-loading hero image can still fail LCP.
Once your speeds are optimized, keep them there. New plugin installs, theme updates, and content additions all affect performance. Run a speed check any time you make a significant change to your site, and revisit this list annually. The tools and best practices evolve, and what was fast in 2017 may not be competitive today.
- How to Check your Wordpress Site's Speed?
- What slows your Site down and how Can you Speed up your Wordpress Site?
- 1. Install a Caching Plugin on your Wordpress Site
- Here are the Top 5 Wordpress Cache Plugins we Recommend
- 2. Optimize your Images Before Uploading Them
- Ways to Optimize Images to Speed Up Wordpress Sites
- Top 3 Image Optimization Plugins for Wordpress
- 3. Keep your Wordpress Site Updated
- 4. Stop Using Sliders!
- 5. Choose a Fast Wordpress Theme
- 6. Hardcode Known Information Instead of Calling the Database
- 7. Clean up Your Database
- 8. Remove Query Strings from Static Files
- 9.Defer loading of Javascript
- 10. Remove Unused Plugins
- 11. Keep It Simple
- 12. Set Browser Caching for Static Files
- 13. Check Your Core Web Vitals
- Conclusion
Related Posts


 Website Maintenance – Use Promocode: scanwp
  Advanced JetPlugins for Elementor
  Semrush 14 days trial
  Kinsta – Managed WordPress Hosting
  Bluehost Hosting